We use cookies to make this site work. We'd also like to set optional cookies so we can understand how the site is used and improve it. We will not set optional cookies unless you accept them. You can change your choice at any time from the Cookie settings link in the footer.
Strictly necessary cookies
These cookies are required for the site to work. They store your cookie preferences and keep your session secure. They are exempt from consent under PECR Regulation 6(4) because they are essential to deliver the service you have requested.
Optional cookies
Optional cookies help us understand how the site is used and provide additional features such as analytics, accessibility tools and translation. We will only set them if you accept.
Vitamin B12 injections: how to self-administer
From 1 Jan 2026 you’ll be trained to give your own B12 injections at home. At your next B12 appointment, book a B12 training appointment and bring your injection with you. At this appointment, the Nurse will show you how to self-administer the B12 injection.
Full instructions and training will be given to you so that you feel confident of doing this yourself in the future, in the comfort of your own home.
We’ll support you and only move to self-injection when you’re ready. If self-injection isn’t suitable, we’ll arrange alternatives.
If this is your first B12 injection, please book an appointment with the Practice Nurse.
Self-administration of Vitamin B12 Injections
Step-by-step instructions with helpful images to guide you through the safe process of self-injecting vitamin B12.
These instructions are only meant for those patients of Weavers Medical who have discussed their vitamin B12 treatment plan with one of the healthcare professionals at the surgery and agreed to self-administration of B12 injections.
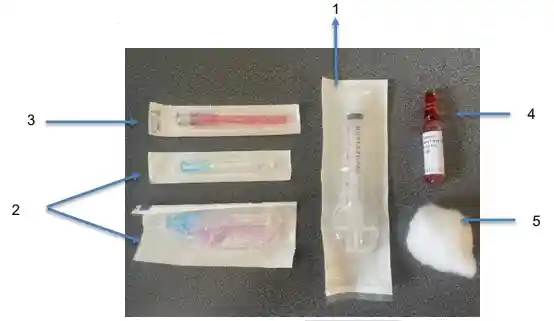
Equipment required for self-administration of B12 injections
- 3ml syringe,
- Green or Blue needle
- Red filter needle
- Vitamin B12 Ampoule
- Cotton wool
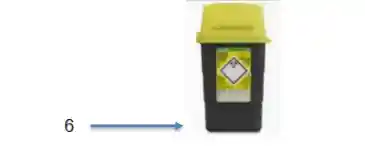
- Sharps bin
Needles and syringes can be purchased online without a prescription. This is normally the most cost-effective way; Amazon have a good stock
Examples
- 3ml Syringe without Needle - Pack of 100
- Disposable Needles - Pack of 100
- Disposable Needles - Pack of 100
If you have any problems purchasing equipment, please contact the Practice for advice.
Procedure
- Check the expiry dates of all equipment and vitamin B12 ampoule
- Ensure you have a clean and dry area to prepare your equipment
- Ensure the injection site is visibly clean
- Wash hands thoroughly with soap and warm water
- Open packets of the red needle, green/blue needle and syringe
- Attach red filter needle to the syringe
- Ensure that there is no B12 solution in the top half of the ampoule by gently tapping/ rubbing it on your preparation surface.
- Using the syringe packaging (to prevent cutting yourself when the ampoule breaks), hold the top of the ampoule with the dot pointing towards you and then push the top of the ampoule away from the dot to break the ampoule open at its centre.
- Discard the empty top of the glass ampoule into the sharps bin
- Using your red filter needle and syringe, draw the B12 solution into the syringe
- Discard the red needle and the empty bottom of the glass ampoule into the sharps bin
- Push a blue/green needle onto the nozzle of the syringe of medication until you hear a click
- Expel any excess air by gently pushing the plunger up
- Remove the cover of needle to expose the needle tip
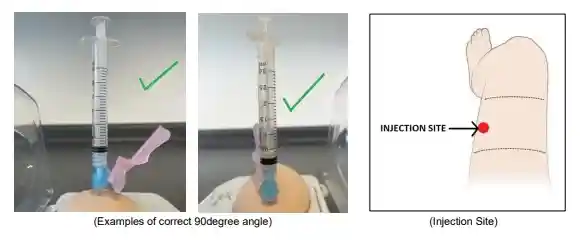
- Insert the needle at a 90degree angle into the middle ⅓ of the outer front of the thigh.
- Gently push down the plunger so that the medication is administered over approximately 10 seconds.
- Remove the needle and press on the injection site with a cotton wool ball for approximately 30 seconds (or until the bleeding stops)
- Close the safety cap of the syringe by pressing it against a hard surface
- Put the used needle and syringe into the sharps bin
- The rest of the empty packaging can be disposed of in a normal rubbish bin
For collection of sharp boxes, residents of North Northamptonshire Council can request clinical waste sack and sharps box collections online. Please visit the North Northamptonshire Council website for more information
Any questions, please contact the surgery to discuss with one of the nursing team